A product file, or catalogue, is a delimited file, usually a comma separated value (CSV) file, containing a supplier's items. A product file import definition defines what information is within which column. This makes sure that the correct information is added to the Horizon database, in the correct place, so you can find information on the Stock Card and display information on the Products and Product Details pages on your HorizonWeb site.
Opening Define Import
- From the Utilities menu, click Define Import. The Define Import window opens.

Where are my import definitions?
The import definitions used to import catalogues are stored in your Database.
- Save – updates the definition.
- Delete – deletes the definition.
- Clear – clears the fields in Define import, ready for a new definition.
- Create New – create a new definition with all the fields entered.
So they can be portable, you can save and load definitions from your File system.
- Save – save to a file
- Load – load from a file
- Load all – load all the definitions from the ImportDefs folder located where Horizon is installed.
ECI Standard Import Definitions
There are three standard definitions. These cannot be edited. When we add new data columns to Data Services portal, and to Automatic Catalogue Import, we will also update the standard import definitions. When we add a new column, we'll add a new field to Define Import too, so you can add them to your own definitions.
- ECI Standard UK Catalogue Import – this is the standard import with VAT codes that map to UK £ catalogues from FusionPlus
- ECI Standard IE Catalogue Import – this is the standard import with VAT codes that map to IRE € catalogues from FusionPlus
- ECI Standard UK Catalogue Import Short Description – this is the same as the ECI Standard UK import except it uses a Short Description.
Note: The VAT Code mappings used are to our recommended codes.
Searching for a definition
To search for a definition that has already been loaded into your database:
- Click in the Import Definition list and type the name of the definition. As you type, the list of definitions changes.
- When the definition you're searching for is in the Import Definition box, press Enter (or click the definition in the dropdown list).
The definition opens, displaying which fields will be populated by which columns.
Editing a definition
- In the Import Definition list, search for the definition you want to edit. The definition loads into the Define Import window.
- Modify the definition using the fields described below. Under the Database group, click Save.
- You are notified that the imported definition has been saved.
Saving a definition to a file
- In the Import Definition list, search for the definition you want to edit. The definition loads into the Define Import window.
- Under the File system group, click Save. The Save File window opens.
- Navigate to where you want to save the file.
- Type a File name, then click Save. The import definition file is saved with a .imp file extension.
Creating a new definition
- Type a name into the Import Name box.
Note: You cannot have import definitions with duplicate names.
- Under the Database group, click Create new.
Note: Create new will create a new definition with all the fields entered. Typing into the Import name box, then clicking Create new, creates a named but otherwise blank definition you can then edit.
Loading a definition from a file
Import definitions can be loaded from files that have been created as import definitions from Horizon. When saved, they are given a .imp file extension.
- Under the File System group, click Load. The Import Files window opens.
- Browse to the import definition file, select it, then click Open.
- You are notified when the import file has loaded. Note that this can be a long process as several checks of the file are made during the import.
- At this point your import definition is not in your database, so cannot be used.
- In the Import name box, change the definition's name so it is unique.
- Under the Database group, click Create new. A new definition is added to your database using the configuration you have specified. The Import name entered is now shown in the Import definition list, showing that this is the selected definition and can be edited.
Configuring a definition
When editing a definition, or creating a new definition, the following can be configured:
- Complete:
- Import name – the name of the import, e.g. ECI Standard UK Catalogue Import.
- Supplier (optional) – if you complete this the supplier will be selected when you use the import.
- Catalogue (optional) – completes this box when you use the import.
- Data file-name (optional) – the name of the actual catalogue file you are going to import.

- Complete:
- Default ISPC code – The Industry Standard Product Classification (ISPC) is a common language for classifying office products. When Full ISPC is a column in the catalogue (see Fields Definitions), and the catalogue item doesn't specify an ISPC code, this code is used instead. The Default ISPC code is not used if Full ISPC is not defined.

- Default ISPC code – The Industry Standard Product Classification (ISPC) is a common language for classifying office products. When Full ISPC is a column in the catalogue (see Fields Definitions), and the catalogue item doesn't specify an ISPC code, this code is used instead. The Default ISPC code is not used if Full ISPC is not defined.
- The Format group must be filled in as this tells the system what type of file it is, without this it will not import.
- 'Skip ? Lines' is used to tell the import to miss the first 'x' lines of the file. For example if you have column headings in row one of the file you need to skip one line. The most common type of file for imports is CSV. If possible, you should always try and save your data files in this format. Excel 97-2003 workbook (.xls) is another common format.
- For CSV and XLS, the delimiter is a comma, so type 44 in to the Delimiter box. 44 is the default setting when creating a new definition. This is the decimal ASCII code for a comma. Other commonly used values are 9 = Tab Delimited and 0 = fixed length. For other decimal ASCII codes, refer to the World Wide Web: example source (external link).

Note: The most common problem faced by users creating their own import definitions, is not setting a delimiter. 44 for a CSV file is the most common setting.
Encoding sets the encoding type used for the CSV file, either UTF-8 or ANSI. Which was used is up to your supplier, and it's difficult to detect it automatically. Most files, including Data Services Portal files, use UTF-8 so if you don't set it in your import file, then UTF-8 is selected in Import Files by default.
- if the file is zipped, extract it from the archive.
- Right-click the CSV file, and from the context menu click Open with > Notepad. The encoding is shown bottom right in the status bar.
- If you can't see the status bar, then from the File menu, click Save as… and the encoding is shown to the left of the Save button.
- Click Cancel.
To check what encoding has been used on your file
- The Type options dictate what the import will do.
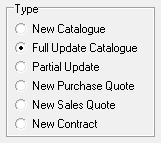 Type Options
- New Catalogue – This will create a new catalogue which will be visible in the test area.
- Full Update catalogue – Sets all items out of use and imports the new items updating existing and adding new.
- Partial Update – Does not set items out of use before importing.
- New Purchase Quote – Once Imported a purchase quotation is created in the daybook
- New Sales Quote – Once imported a Sales Quotation is created in the daybook. When importing you need to select which customer to create the sales quotation for.
- New Contract –
- To tell the import where to find each piece of data within the file you are importing, you will need to tell it which field is in what column in the data file. To do this enter the column number into the relevant field. If column 'A' in your data file is Code then type '1' in the Item Code row, in the Column column. You can give the field a length limit but this is not required. This then needs to be done for each column in the file you wish to import.
 Fields definitions
Col – Type the column number from your catalogue file that contains each field.
Len – If the catalogue uses a fixed length format, not a delimited format (e.g. separated by a comma or tab), type the length of the field (the number of characters).
Case – a character which defines how descriptions are managed, or how an item is flagged in the import file.
- Item code – Item's code. An alphanumeric code, 30 characters max.
- Item description – 150 character item description . Usually this is a maximum 40 character description. You can also import in UPPER CASE, lower case, Sentence case or Caps First, by typing a letter in Description case.
- Item supplier – Enter the column no. for suggested supplier.
- Pack – item's pack size
- Sales pack – item's sale pack
- Horizon pack – when set, a pack size that overrides the item's pack size.
- VAT rate – VAT rate for the item. The character in this column is mapped to the VAT rate set up in Horizon using the VAT code map.
- VAT code map – Number/character in the catalogue file that maps to the configured VAT codes. The button shows how many catalogue to VAT code mappings have been created in the selected import definition.
- Keywords – Keywords that your customers use when searching for the product in HorizonWeb. Overwrite keywords can be selected in Import Files to replace, rather than append, keywords.
- Page number –catalogue page the item is on (if the imported catalogue has pages)
- Page alpha – position on page in supplier's catalogue
- Matrix – item's matrix letter, a supplier's classification based on catalogue, range and product demand
- Colour code – item's colour code, a supplier's classification based on broad product ranges
- Web description – 150 character description typically used on HorizonWeb. Imported to the item.
- Discontinued – items are flagged as discontinued when they are no longer available from your supplier, or will be no longer available after their available stock has been exhausted.
- Net – item is net priced. In the third box, type the value used to flag net priced items, e.g. Y or 1.
- Hide web – item cannot be searched for on HorizonWeb. In the third box, type the value used to set hide on web, e.g. Y or 1.
- Not returnable – non-returnable item. In the third box, type the value used to set an item as non-returnable, e.g. Y or 1.
- Green – item is flagged as "green" (usually by the supplier as part of a catalogue import). The item meets an environmental credential of some sort, such as being manufactured from recycled materials, displaying the Fairtrade Foundation mark, or an energy efficiency award.The Green flag is set by VOW. Catalogues downloaded from the Data Services Portal do not contain the Green flag, but the attributes downloaded do include attributes such as Recycled Product. The third column is the character used to flag Green items, e.g. Y.
- UNSPSC – the UNSPSC (United Nations Standard Products and Services Code) classification the item falls within.
- UOM – item's unit of measure.
- CO₂ emissions – the carbon footprint associated with a product.
- Volume – volume of the packaged product. .
- Weight – product's mass in kilograms
- Country of origin – country of origin which can be used when readying a customs declaration. Use the two letter codes on HMRC's website (external link)
- Commodity code – code for product (external link), used when readying a customs declaration. Ten character code
- Loyalty Points – the amount of points which can be added buying the product, or used to redeem collected points
- Retro% – amount of retro returned on purchase of product
- Fusion ID – link to enhanced data information, as supplied by FusionPlus, downloaded from Data Services Portal and imported as Enhanced Data. This affects what is displayed on your HorizonWeb site
- Fusion UOM ID – A Unit of Measure (UOM) specifies the standard quantity in which an item is packaged. For example, drinks can be sold as a single can, a two-litre bottle, a six-pack or a crate of 24 cans. Since each UOM has a different cost, it should be treated as a separate product. The Fusion UOM ID does not represent a UOM itself but instead allows items with the same UOM to be grouped. For instance, a product may have a Fusion UOM ID of 1 for a single unit (each), while a six-pack may have a Fusion UOM ID of 2. This field is used to distinguish different UOMs, but it does not function as a multiplier. UOM IDs differ between products, i.e. Fusion UOM ID = 1 could be an each for one product, but a ream for another.
- The following settings are used when importing sales quotes or sales contracts.
- Qty – quantity for the quote line
- History qty – history quantity for quotes
- Document ref – Document Reference - for quotes
- Deal method – when importing contracts with deal methods, the ID for the deal method.
- Manual cost flag – for contracts.
- The following settings are used to maintain products' classifications.
- Full ISPC – BOSSF ISPC code. If the value in the catalogue is blank, then the code typed into Default ISPC code is used instead. If there are existing products, selecting Overwrite ISPC updates the Range, Group and Subgroup of the products.
- Range – product's range category.
- Group – product's group (within the product range)
- Subgroup – product's subgroup (within the product group)
- Brand – product's brand
- Manufacturer – product's manufacturer. A manufacturer may have several brands.
- Consumer Lead – number of days before your customer will receive a product delivered directly to them (pick, wrap and deliver)
- Dealer lead – number of days before you will receive a product delivered to your warehouse (standard, or pick, wrap and label).
- Stocked – item will be stocked (Stock Card > Stock Options) under the branch that is selected on import. The third column is the character used to flag stocked products. e.g. Y. This is set on the product, not the item, so it will affect all items linked to the product.
- Marketing text – Imported to the product's Marketing tab on Stock Card.
- Full description – Imported to the product on the Image and Text tab.
- Delivery info – Imported to the product's Delivery Info on the Image & Text tab.
- Image file-name – file system path to image.
- Image URL – product image absolute URL (external site).
- URL will be created with display order 0 if it doesn’t already exist for that product. If you want to import additional image URLs, use Load Image URLsor configure Additional Image URLs if they are included in your catalogue.
- If an image record already exists for display order 0 then the image URL is updated.
- Image URLs included in a product file import, rather than the Enhanced data import, are identified separately.
- Additional Image URLs – additional product image absolute URL (external site). Products can have multiple image URLs, with each image URL as a separate column in the catalogue file. The button tells you how many have been have been configured. Click the button to amend the configuration.
- Master Code – Enter the column no. that holds a master code.
- If the cell is not empty, the product is imported as child code.
- A master product will also be imported if it did not previously exist.
- The master product will use item data from its first child product from the import file.
- Master products are set created as Service products.
- Price as Master – Sets all child codes imported to Price as master.
Bullet Points are displayed in the HorizonWeb Product Details page, Features section. You can add four columns from the catalogue to your Bullet Points.
- Replace Open Range – The product's Open Range ID will get updated with the Fusion ID. updating the Custom Data ID on the Stock Card.
- The Pricing group should be filled in like the Fields above. Enter the column that each price format is in within the data file. The Factor column is used to adjust the price when importing. It is recommended putting a 1 in this column if you are using the standard price.

- The Look-ups section is used to link items to products. If this is the first time a catalogue is loaded, and the code added doesn't previously exist, the new item is linked to an existing product with a look-up. It is also used in conjunction with the option Remerge existing to merge items that already exist on your system:
when selected, products that match on look-ups are merged. It is recommended that you try this option out on a test database first. This is because the process cannot be undone, unless you unlink each item individually using Create product.
Note: Barcode catalogues should not have a pack size of 0. If they do, pack size is changed to 1.

- The import definition can specify up to four look-up columns. Type the trader code for the supplier in each numbered box, then in the corresponding Column box, the column number that holds that supplier's item code. In Import Files, these are shown in the Look-ups group, and can be changed before clicking Load product file.
- Any – selects the option Look up any supplier in Import Files: When cleared, look-ups are matched against the suppliers' catalogues listed in the Import Files > Look-ups group. When selected, look-ups are matched against any supplier's catalogue and the Look-ups group is made unavailable. Items are matched using (highest priority first) a) the code from the catalogue, b) look-ups, c) barcode (if Match barcode is selected). If Active only is selected then both the catalogue and item matched to must be in use.
- Manufacturer code –
- 14 – Selects the option Force 14 barcode in Import Files. When selected, if the barcode is not 14 characters in length, 0s are added to the start until it is 14 characters long.
- Look-up – selects the option Match barcode in Import Files: when selected, if a barcode is included in the catalogue, it is used to match the item to existing products.
- The Attributes group lets you define a number of columns which can hold product attribute data. It also lets you include attributes in item descriptions.
Note: Attributes must be saved to your definition files, because they are bespoke to each database. If you get a definition file that includes attributes, delete them and re-add them.
- In the Name list, select an attribute.
- In the Column box, type the column number that holds that attribute data.
- In the Description order box, type the position that the attribute should be added to the item description for child products. All attributes are added at the beginning of the description in the order defined, 1 being first. 0 means the attribute is not included in the description.
- Click Add.
- Repeat for each attribute.
- To delete an attribute from the list, right-click the attribute and from the context menu, click Delete.

Note: When importing, attributes are added to the product. Existing attributes are not replaced.
Note: If a Master Code column is set, then empty attributes are added to the master product for the attributes of its child products. For example, if a catalogue contains shirts and trousers, you can add the attribute Leg length to the import. Leg length will only be imported as an empty attribute for the trousers master products because the Leg length column for shirts is empty in the catalogue.
- The next set of options set the default setting when the import definition is opened. If the LOCK (No change when running) option is selected, the options cannot be changed on the import product file screen.
 Option Definitions
- LOCK (No change when running) – If set then you cannot change the imp on import
- Change preferred supplier – when selected, the item's product’s preferred supplier is updated to the catalogue's supplier. If Supplier is set as a column in the import definition, and the item in the file has a supplier Code in this column, then that supplier is set, otherwise the catalogue's supplier (the Trader set in Import Files) is used.
- Change suggested supplier – when selected the item's suggested supplier is updated to the catalogue's supplier. If Supplier is set as a column in the import definition, and the item in the file has a supplier Code in this column, then that supplier is set, otherwise the catalogue's supplier (the Trader set in Import Files) is used.
- Discontinued = Out of use – when selected, if an item is set as Discontinued, then it is also set as Out of use. Discontinued must be set as a column in the import definition, and the item in the file has Y in this column to indicate it has been discontinued.
- Allow retail drop – when selected, Retail is set to what is set in the catalogue. When cleared, Retail is only updated if the value in the catalogue is higher than the existing value.
- Update last cost – when selected, the last cost for the product is updated (if the supplier is the product's default supplier and the company option Last cost any supplier is selected) with the cost/pack from the catalogue.
- Default to main catalogue – when selected, information not included is set to be same as the product's lead item (namely Description, Web description, Retail, Cost, Trade, Sell, Matrix, Cat Page, Cat Page Alpha, Pack, Sale Pack, VAT rate and Colour). Often used when adding a mailer when not all the data is provided.
- Clear quantity breaks –
- Allow new items to be created – when selected, if an existing item code cannot be found then a new item will be created. When cleared, an item is not created and the process continues to the next line in the catalogue file.
- Net catalogue – when selected, all items are set as Net priced even if no Net column exists in the catalogue.
- Update highest cost – when selected, updates Highest cost on the Stock Card.
- Unique codes only – when selected, item codes are checked to make sure each code is unique. If an existing code is found, the process proceeds to the next line in the catalogue file.
- Remerge existing – when selected, products that match on look-ups are merged. It is recommended that you try this option out on a test database first. This is because the process cannot be undone, unless you unlink each item individually using Create product.
- Trader on line in file – when cleared, then the Trader and Catalogue lists can be selected. When selected, and your import definition has a column specified for Trader, and the traders in the file have a catalogue assigned in Supplier settings > General, then items in the imported catalogue will be added or updated to the assigned catalogue. This means your file could have items from several suppliers, updating different catalogues as part of the same import.
- LOCK (No change when running) – If set then you cannot change the imp on import
- The Filter is used if you have a column in the catalogue that dictates if the product is to be imported or not. For example, the Integra catalogue includes products that are not included in the printed catalogue, so a column is added to tell the system which appear in this. To use the filter, set the column in the filter box that holds the character which symbolizes if it's to be included or not, then put the character in the 'Test' box. For example, if column 6 in your catalogue held a 'Y' or 'N' to denote if it's in the catalogue or not, you would enter, 'Include: Filter: 6 Test:Y '

- Once you are happy with the set-up of the import definition, click Save. If you are creating a new definition, the Import Name is then shown in the Import Definition list. You can now select this definition when importing product files.
Deleting an Import Definition
- In the Import Definition list, click the name of the definition you want to delete from your database.
- Under the Database group, click Delete.
- Confirm that you want to delete the definition.


