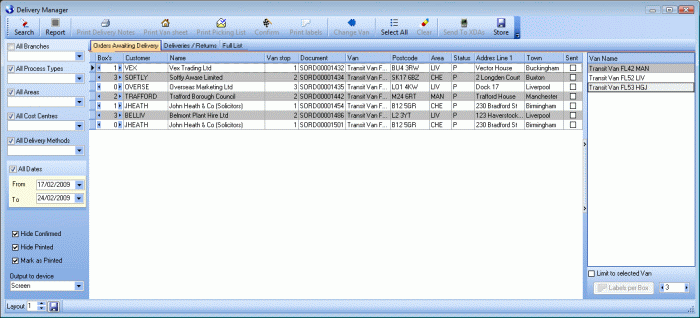
The Delivery Manager is found in the Sales Delivery and Collections daybook and is opened by clicking Delivery Manager button.
Delivery Manager is used to:
- process your delivery notes that are ready for delivery
- manipulate sales orders that are due to be delivered in the future.
- send the notes electronically to PDAs or hand-held devices.
There are three tabs in the Delivery Manager:
- Orders Awaiting Delivery – This shows sales orders that are not ready to be delivered allowing you to modify them in advance.
- Delivery/Returns – This tab will list sales delivery notes that are ready for delivery. This will be the screen most commonly used.
- Full List – Here you can view all deliveries, including those already delivered.
Searching
To search for delivery notes:
- On the Sales menu, click Delivery and Collection Notes.
- On the toolbar, click Delivery Manager.
- You can filter the entries displayed using the criteria on the left hand side of the Delivery Manager window, Branch, Process type, Area, Cost centre, Delivery method or Date.
- All dates – Select to view all (by default) or filter for Yesterday or Today or by date range.
Note: All dates does not remove the date filter. Set an early From date to do this.
- Exclude where on a previous van sheet –
- Hide sent –
- Hide confirmed – If you have configured Horizon to auto confirm delivery notes, then, when selected, they will not appear in this list.
- Hide printed – delivery notes are flagged as printed when they have been printed on a printer, or sent to display in a different manner, such as to the screen or a PDF file. When selected, "printed" delivery notes will not be displayed.
- Off - document number option. Confirm means it's been delivered. Will not appear unless you clear Hide confirmed.
- Mark as printed – once processed, the delivery notes will be marked as printed, and sent to the device specified.
Vans
To filter the list by van, click a van to select it. then select Limit to selected van.
- All dates – Select to view all (by default) or filter for Yesterday or Today or by date range.
- Below the grid there is a number box and an option All.
- Select All to return every delivery note that matches you search criteria.
- Clear All and type a number in the box to the left to limit the number of delivery notes listed.
- Click Search.
Actions
Once you've got the list of orders to process, use the options at the top of the screen to perform actions.
Selection
Select a group of delivery notes using extended selection. or:
- Select All – selects all orders.
- Clear – clear selection
The following actions are used to process the selected documents:
- Print Delivery Notes –
- Print Van Sheet –
- Print Picking List –
- Confirm –
- Print Labels –
The other options allow you to , send the note to the driver's PDA, electronically, using the Masternaught service, or to JumpTrack, ECI's latest proof-of-delivery application. You can also store the current settings as a template for future processing.
- Change Van – changes the van the delivery is assigned too
- Send to XDAs – sends the delivery notes to the driver's PDA, using the Masternaught service.
- Collect from XDAs – collects updates about the deliveries via the Masternaught service.
- Send to JumpTrack – sends the delivery notes to JumpTrack website
- Collect from JumpTrack – collects updated delivery information from the JumpTrack website
- JumpTrack Send Logs – a log of JumpTrack delivery information: Date, Result and Route.
- JumpTrack Collect Logs – a log of JumpTrack delivery information: Date, Code and Result.
- Store – Stores the settings for that user, so they persist the next time you use Delivery Manager.
- Export to MapPoint – exports delivery data


