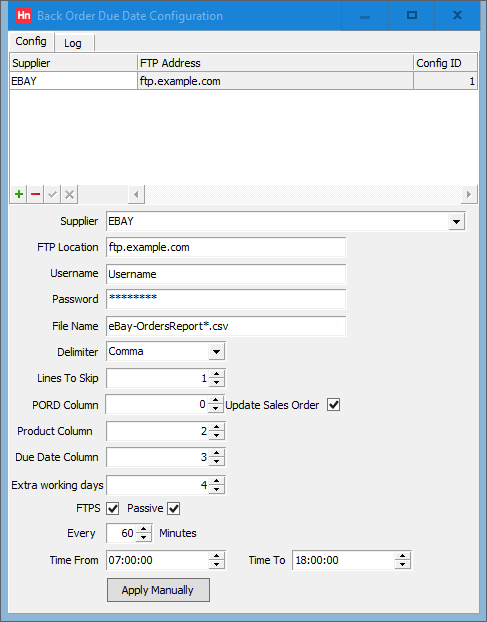
A separate configuration is required for each supplier.
- On the Utilities menu, click Back Order Download.
- Click the Config tab. The grid at the top of the window displays the suppliers you have configured.
- To create a new configuration, click the green plus button, located below the grid. A blank row is added to the grid.
- In the Supplier list, click the name of the supplier.
- In the FTP location box, type the server the file is uploaded to by the supplier.
- In the Username box, type the username supplied by your supplier.
- In the Password box, type your account's password.
- In the File-name box, type the name of the file your supplier uploads.
EXAMPLE
You can use a wild card character in the file-name if your supplier adds a date to the file-name which changes every day. for example, if your file is called: Supplier-OrdersReport-Jun-30-2022-06_00_00-0700-111846592.csv, set the File-name to Supplier-OrdersReport*.csv. The * represents the time data in the file-name, any file that starts Supplier-OrdersReport can be collected.
- In the Delimiter list, click the name of the character used to separate values in the file. This is usually Comma.
- In the Lines to skip box, type the number of lines Horizon should miss when parsing the file. This is often 1, because the first line of the file is used as a header which describes the column names.
- In the PORD column box, type the number of the column which contains the Horizon document reference, starting PORD.
Note: The first column is numbered 0, the second 1, the third 2 etc.
- Select Update sales order if you want sales orders, linked to the purchase orders, updated with
- In the Partcode column box, type the number of the column that contains the item code.
- In the Due date column box, type the number of the column that contains the date the item will be delivered.
- If the supplier is using an FTPS server, select the FTPS option.
Note: Horizon supports FTPS. Horizon does not support SFTP.
- If the supplier is using passive mode, select the Passive option.
- Type the number of minutes between each collection. The minimum setting is Every 60 minutes.
- In the Time from box, type the time from when collections will start.
- In the Time to box, type the time from when collections will finish.
- In the Extra working days box, type the number of additional working days counted (beyond the Due date) before the row will be processed.
Example
Working days are defined in Utilities > Orders and Receipts Import > Days of the Week. If you have selected all but Saturday and Sunday as working days, and set Extra working days to 1, then, for a row with a due date:
Which is a Tuesday, the row will be processed on Wednesday.
Which is a Friday, the row will be processed on Monday.
- Click the green tick to confirm your changes.
- You can now test the configuration by processing a file to which you can browse. Click Apply manually to process back order files placed on the FTP server.
Note: All date formats are DD/MM/YYYY.


