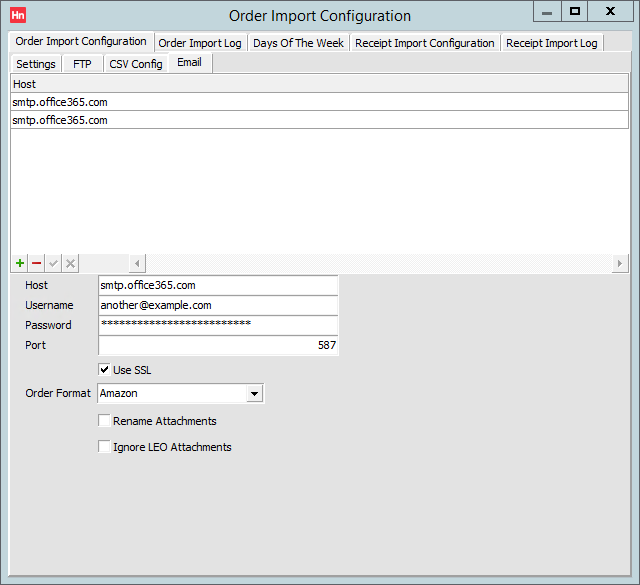
Sales orders can be emailed to an email account. The body of the email, or attachments to the email, are imported into Horizon. The format of the orders should be selected. More than one account can be configured.
Order emails are identified by Orders and Receipts Import Service by starting the subject line with <LDMORDER>.
Orders from an email account are processed once and order emails are deleted after processing. All emails in the box will be marked as read as part of the verification process.
Setting up an Email Account for Order Import
You will need to set up an email account, and have the account credentials. Then:
- On the Utilities menu, click Order and Receipts Import Config.
- Click the Order Import Configuration tab, then the Email tab.
- Complete the following boxes:
- Host – the SMTP (sending) email server address.
- Username – the email address of the account you have set up.
- Password – to authenticate the user.
- Port – port through which email traffic is directed. Consult your email provider's guide. Commonly used ports are 25 (standard), 465 (SSL) and 587 (TLS).
- Use SSL – select if the email server requires secure authentication.
- Order Format – the file format of orders you will be importing from this email address.
- Rename attachments – select to rename the email attachments as they are saved to the import folder location. The file-name will be a time stamp followed by the file extension for the format. This ensures that every file-name is unique. If cleared, the file-name will be unchanged, which you may prefer when identifying files.
- Ignore LEO attachments – LEO is the Vision file format. If you are importing LEO files, then they can have the order in the body as well as in an attachments. Select to ignore the attachments.
- Click the green tick below the list. The settings are added to a row, identified by the Host.
Editing an Email Setting
- On the Utilities menu, click Order and Receipts Import Config.
- Click the Order Import Configuration tab, then the Email tab.
- Select the row of settings you want to change, then edit the settings listed above.
- Click the green tick button to confirm, or the red cross to discard your changes.
Deleting an Email Setting
- On the Utilities menu, click Order and Receipts Import Config.
- Click the Order Import Configuration tab, then the Email tab.
- Select the row of settings you want to delete.
- Click the red minus button. You will asked to confirm that you want to delete the record.


