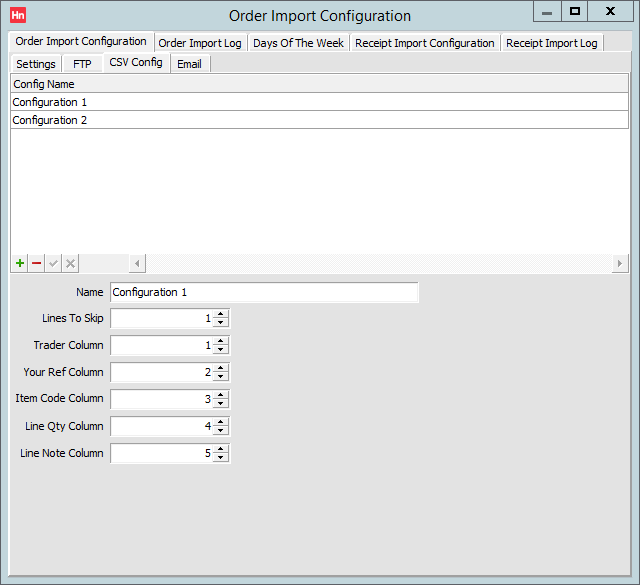
You can set up a CSV import to allow you to import orders which include the following columns:
- Trader code – up to 30 character code to uniquely identify the trader. We recommend using up to 20 characters.
- Your ref – your customer's reference.
- Item code – Item's code. An alphanumeric code, 30 characters max.
- Line quantity – quantity of item.
- Line note – note specific for the order line.
The file you are supplied with may include other columns – these are ignored.
How Orders Are Created from the CSV File
- Lines with the same Trader code and Your ref become detail lines on one order.
- Each different combination of Trader code and Your ref creates a new order.
- The order's source is set to Web.
Creating a CSV Configuration
- On the Utilities menu, click Order and Receipts Import Config.
- Under the Order Import Configuration tab, click CSV Import. A list of configurations is displayed at the top of the window, and the fields for the selected configuration below that.
- Click the green + button. A blank line is added to the list.
- Complete the following boxes:
- Name – name for the configuration which is used when selecting the configuration on the FTP tab.
- Lines to skip – number of lines in the file that should be skipped, for instance, the first line may be used as a heading for the file's columns, so you would set this to 1;
- Trader column – trader code, used to identify the customer;
- Your reference column – customers' references;
- Item code column – item codes;
- Line quantity column – quantity for that item.
- Click the green tick button at the bottom of the list. The configuration is updated.
Modifying a CSV Configuration
- Click the configuration in the list.
- Modify the settings in the boxes.
- Click the green tick button at the bottom of the list. The configuration is updated. To discard your changes, click the red cross button.
Deleting a CSV Configuration
- Click the configuration in the list.
- Click the red minus button at the bottom of the list.
- Click OK to confirm you want to delete the record. The configuration is deleted.


