Changing the Look and Feel of Horizon lets you to customize your desktop to match other applications, create a noticeable difference between live and test environments, or add a seasonal theme.
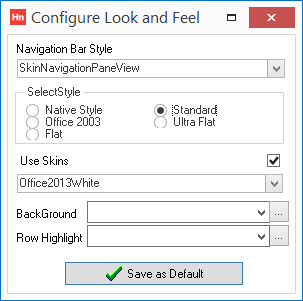
- From the Set-up menu, click Look and Feel. The Configure Look and Feel window opens.
Changing the Navigation Bar
The Navigation Bar is the left hand menu. There are two types of Navigation Bar you can choose from:
- Navigation Pane – the last selected menu jumps to the top of the list and displays all the submenus underneath. Other top level menus are listed below that.
- Explorer Bar – the top level menus stay in the same order. To start with, the explorer bar expands all top level menus displaying the submenus. You can either use a vertical scrollbar, or collapse the top level menus before finding your submenu.
Other views are variations of the two types with flat or plinth out buttons.
- In the Navigation Bar Style list, click a style. The screen will update immediately.
Changing the Style
The Style changes the appearance of the rest of Horizon. The spacing and the appearance of the toolbar buttons are changed.
- In the SelectStyle group, select from:
- Native Style –
- Standard –
- Office 2003 –
- Ultra Flat –
- Flat –
Using Skins
Skins overlay the selected style with a graphical theme.
- Select the Use Skins option.
- Click Save as Default. Skins are now enabled.
- From the Set-up menu, click Look and Feel. The Configure Look and Feel window opens.
- From the list, click a skin name. The skin is immediately applied.
Changing Highlights and Backgrounds
- Background list – changes the colour of window's backgrounds. Using a skin will supersede this setting.
- Row Highlight list – Horizon uses alternate coloured rows on grids to help you identify which cell relates to which document. The first colour is set by the style. This is the alternate colour.
- From the Background list, or Row Highlight list, click a colour.
- To choose a custom colour, click the […] button. The Colour window opens.
- Click Define Custom Colours. A colour palette is displayed. Click within the square to select a colour. Clicking to the left or right changes the colour's hue. Clicking higher or lower changes the colour's saturation. Using the slider to the right changes the colour's lightness. This is known as a HLS colour model. Alternatively, if you know the colour's Red, Green and Blue values, click in the boxes and type those values. The HLS square and values will update.
- Click Add to Custom Colours. The colour will be added to the Custom colours palette. Click the colour in the palette, then click OK.
If the colour is named, it appears in the list. If it is a custom colour, the list is blank. The background colour is updated in the Configure Look and Feel window immediately. Other open windows are not updated. The Row Highlight colour is updated immediately.
Keeping Changes
- Click Save as Default. When restarting Horizon your look and feel will be applied when your user has logged in.


